Knowledgebase
Web Disk Print this Article
The Web Disk application allows you to manage and manipulate files on your server in multiple types of interfaces, such as your PC, mobile device, or certain types of software. You can choose a more familiar interface that will make file management tasks easier to complete.
For example, if you access Web Disk from your computer, it will open in a window with which you can move, add, or delete files on the server, as shown below:
The Web Disk Utility
Main Web Disk Account
By default, the Main Web Disk Account is created with the user's home directory set as the Web Disk location. This account uses the same login information as your cPanel account and has access to all of the files in your home directory.
The Main Web Disk Account Login and Directory are displayed in the Main Web Disk Account table. From this table you can choose to perform the following actions:
- Click Access Web Disk to open Web Disk on your computer.
- Click Enable Digest Authentication to allow Windows® Vista, Windows® 7, or Windows® 8 to access your Web Disk over a clear text or unencrypted connection.
Create an Additional Web Disk Account
You can create additional users to use with the home directory, or any subdirectory under the home directory, as the Web Disk location.
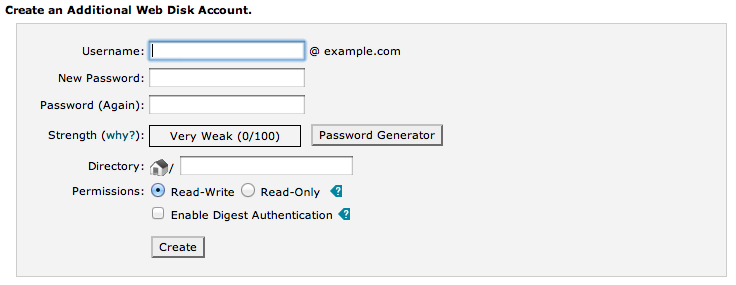
Create an Additional Web Disk Account.
To create a Web Disk account, perform the following steps:
- Enter the desired username in the Username text box.
- If you have more than one domain, select a domain or subdomain from the menu.
- Enter the desired password in the New Password text box.
- Passwords must be at least five characters long.
- To randomly generate a strong password, click Password Generator.
- Confirm the password in the Password (Again) text box.
- Enter the directory that you wish Web Disk to connect to on startup in the Directory text box.
- Select the Permissions level for this account.
- Read-Write — This access level permits all supported operations inside the assigned directory.
- Read-Only — This access level only permits this account to read, download, and list files inside the assigned directory.
-
If you use Windows® Vista, or later versions of Windows®, and you wish to use Digest Authentication without SSL, select the checkbox next to Enable Digest Authentication without SSL (Windows® Vista (or later) support).
- Click Create.
Manage Additional Web Disk Accounts
The Manage Additional Web Disk Accounts table displays all additional user accounts that you create for Web Disk. If you have a large number of Web Disk accounts, you can use the Search box above the table to find specific accounts.
|
Column
|
Description
|
|---|---|
| Login | The login for the account, in username@domainname.com format. |
| Directory | The assigned directory for the account. * Click on the directory path to open the directory in a new File Manager window. * Click  to change the assigned directory. to change the assigned directory. * Click  to change password protection for the directory. See below for more information. to change password protection for the directory. See below for more information. |
| Access Web Disk | Click Access Web Disk to go to that account's Web Disk interface. See below for more information |
| Actions | From this column you can Enable Digest Authentication, Change Password, Delete the account, and toggle permissions between Read-Only and Read-Write. See below for more information. |
Password protect a Web Disk directory
To password protect a Web Disk directory, perform the following steps:
-
Click
for the Web Disk account that you wish to protect. A new window will appear. - Select the Password protect this directory box.
- Enter a name for the protected directory in the Name the protected directory text box.
- Click Save.
Create a user to access a protected Web Disk directory
To create a user who can access the protected directory:
- From the Manage Additional Web Disk Accounts table, click for the Web Disk account and directory that you wish for the new user to access. A new window will open.
- Enter the desired username in the Username text box.
- Enter the desired password in the New Password text box.
- Passwords must be at least five characters long.
- To randomly generate a strong password, click Password Generator.
- Confirm the password in the Password (Again) text box.
- Click Add/modify authorized user.
Remove an authorized user from a protected directory
To delete a user:
- From the Manage Additional Web Disk Accounts table, click for the Web Disk account and directory that you wish the new user to access. A new window will open.
- Select the username you wish to delete from the text text box under the Authorized Users heading.
- Click Delete User.
Access a Web Disk account
To log in to a Web Disk account:
- Click the Access Web Disk button that corresponds to the account that you wish to access.
- Select your operating system's version from the appropriate menu.
- Select the SSL checkbox if you wish to connect with SSL.
- Follow the Manual Connection Instructions or the Quick Start Script Instructions to connect to your Web Disk.
- The Quick Start Script will download and run a script on your PC to connect to your Web Disk.
- If you use Nautilus or Konqueror on a Linux system, you do not need to download a script. Follow the instructions that appear on the page.
Enable or disable digest authentication
To enable digest authentication:
- Click Enable Digest Authentication.
- Confirm your password in the Enable Digest Authentication dialog box.
- Click OK.
To disable digest authentication:
- Click Disable Digest Authentication.
- A Disable Digest Authentication confirmation dialog box will appear.
- Click OK.
Change the Web Disk password
To change a Web Disk password:
- Click the Change Password link that corresponds to the account for which you wish to change the password.
- Enter the new desired password in the New Password text box.
- Passwords must be at least five characters long.
- To randomly generate a strong password, click Password Generator.
- Confirm the password in the Password (Again) text box.
- If desired, check Enable Digest Authentication.
- Click Change.
Delete a Web Disk account
To delete a Web Disk account, perform the following steps:
- Click the Delete link that corresponds to the account that you wish to delete. A new page will appear.
- Click Yes.
- If you wish to keep the account, click Cancel.
Set Web Disk account permissions
To change a Web Disk account's permissions, perform the following steps:
- Select the Permissions level for the account.
- Read-Write — This access level permits all supported operations inside the assigned directory.
- Read-Only — This access level only permits this account to read, download, and list files inside the assigned directory.
- A Setting Read-Only Access or Setting Read-Write Access confirmation dialog box will appear.
- Click OK.
Note for Windows® 7 users
If you use Windows® 7, you may notice a discrepancy between the amount of disk space that is reported and the amount of disk space that is actually available. This is due to the fact that the WebDAV protocol, which Web Disk uses, is unable to query a server's disk capacity.
For more information, read Microsoft Support's article about this problem.
Was this answer helpful?
Also Read
File Manager allows cPanel users to manage and edit their files. The File Manager Directory...
The Backups area provides a basic interface for downloading and storing all or some of the...
The Backup Wizard is a user-friendly interface you can use to create a backup of the entire site,...
You can exclude files and directories from your backups by creating an exclude file in your home...
This interface displays information about how you use your disk space. It can also help you...