Knowledgebase
HTML Editor Print this Article
The HTML editor allows you to easily edit your HTML documents from cPanel's File Manager feature. This visual HTML editor, sometimes called a WYSIWYG (What You See Is What You Get) editor, brings powerful editing functions of familiar desktop editors, like Microsoft® Word, to the web. You can access the HTML editor in cPanel -> File Manager.
This guide is intended for users who want a simple way to create or edit a web page. For more information on the HTML editor, read the User's Guide.
Toolbar
The editor includes a built-in toolbar with several different content tools you can use to edit content. The table below describes some of the important tools on the toolbar. Read this section of the User's Guide to learn more about the toolbar.
|
Feature
|
Icon
|
Description
|
|---|---|---|
| Save |  |
Saves the file to the server. |
| Templates |  |
Structures your document with pre-built forms. Each template includes elements such as page layout, text format, and style. |
 |
Prints the file. | |
| Paste tools |  |
|
| Undo/Redo |  |
Use the arrows to undo and redo selections of text in your content. The arrow that points to the left will remove any content that was just added in. The arrow that points to the right will redo anything that was just removed. |
| Find and Replace |  |
Searches the text for certain content. You can also use Replace to search for the content and then replace it with different content that you enter into the text box. |
| Select all |  |
Selects the whole document, which you can then cut, copy, or delete. |
| Form tool | Contains the form elements, which include checkboxes, text fields, selection fields, and buttons. All form elements must be contained within the form container. Read this section of the User's Guide to learn more about the form tool. The elements within a form include:  — A checkbox allows you to select either one or more items from a list within a form. — A checkbox allows you to select either one or more items from a list within a form.  — A radio button allows you to select one item from a list within a form. — A radio button allows you to select one item from a list within a form.  — A text field is a single-line field which allows you to enter text. — A text field is a single-line field which allows you to enter text.  — A text area is a scrollable, multiple-line field which allows you to enter text. — A text area is a scrollable, multiple-line field which allows you to enter text.  — A selection field is a scrollable list which allows you to select one or more options. — A selection field is a scrollable list which allows you to select one or more options.  — A button allows the user to complete and submit the form. — A button allows the user to complete and submit the form.  — A hidden field is a field which the user cannot see but is still submitted to the server when the form is complete. — A hidden field is a field which the user cannot see but is still submitted to the server when the form is complete. |
|
| Text tools |  |
Changes the appearance of text with Bold, Italic, and Underline options. Other options include Strikethrough, Subscript, and Superscript ( |
| Remove Format tool |  |
Removes the selected text format style, but maintains the text itself. If you copied your content in from an outside source and the format is inconsistent with the rest of your document, click this option to set the text back to the default style. |
| List tools |  |
Creates an ordered (numbered) or unordered (bulleted) list in your content. |
| Indent tools |  |
Increases the left or right indentation for the selected paragraph. |
| Block quote tool |  |
Creates a block quote for the selected text. To learn more about this feature, read this section of the User's Guide. |
| DIV< /> |  |
Creates a div container around the selected text. |
| Alignment tools |  |
Formats selected text or images with the left align, center, right align, or fully justify options. |
| Link tools |
|
Creates a link to a website or file in your content. If you have added a link that you no longer need, you can highlight the link and use the broken link icon to remove it. |
| Anchor tool |  |
Creates anchors in your content to link to another section within your website. |
| Image tool |  |
Allows you to insert an image into your file. This also gives you the option to browse the server and select an image from the server and not on your local computer. |
| Insert tools |  |
Adds tables, horizontal lines, page breaks, and other special characters to your content. |
| IFrame tool |  |
Allows you to include multi-media elements, like YouTube videos and Flash objects, in your document. To learn more about this feature, read this section of the User's Guide. |
| Styles menu |  |
Sets the style of font for the selected text. |
| Paragraph Format menu |  |
Sets the paragraph style for the selected text. |
| Text direction tools |  |
Set the direction of your text from left to right or from right to left. |
| Font menu |  |
Sets the font option for the selected text. We recommend that you use fonts that are considered global to all computers so the style you set will remain the same. |
| Size menu |  |
Sets the font size for your text. |
| Color tools |  |
Sets the color of the text as well as the background color of your text. |
| Minimize |  |
Minimizes the interface to fit smaller windows. |
| Show Blocks tool |  |
Displays a grid that separates the block-level elements with HTML tags. To learn more about this feature, read this section of the User's Guide. |
| < > Source |  |
Allows you to access the source code for the content area. |

Insert an image
To insert an image:
- Click from the toolbar. The editor will display the Image Properties window.
- The Image Properties window includes three tabs:
- Image Info (default) — Allows you to set the image URL and manipulate how it will display in the document.
- Link — Allows you to create an image link, which can point to another web page, a video, a PDF document, etc.
- Upload — Allows you to store your images on the server, where they can be retrieved even without your local computer.
-
Advanced — Allows you to configure image options such as ID assignments, classes, tooltips, CSS properties, etc.
- The Image Properties window includes three tabs:
- Once you have confirmed your options in the Preview window, click OK.
For more information about the Image Properties window, visit the CKEditor User's Guide.
HotLink Protection
If you have enabled cPanel's HotLink Protection feature and your primary domain account is excluded from your list of enabled hotlinks, you may not be able to see embedded images.
To view a list of domains for which you have enabled hotlinks, navigate to HotLink Protection (Home >> Security >> HotLink Protection). You will need to add your primary account's URL to the URLs to allow access list. For example, if your primary domain is example.com, add http://cpanel.example.com/ .
For more information about how to manage hotlinks, read our HotLink Protection documentation.
The File Browser
When you click on each tab in the Image Properties window, you will find a Browse Server option, which directs you to the HTML editor's File Browser. Here, you can browse, upload, and manage images that are located on the cPanel web server.
The File Browser interface is similar to other conventional file browsers you find on your computer's operating system. We have divided the interface into four sections:
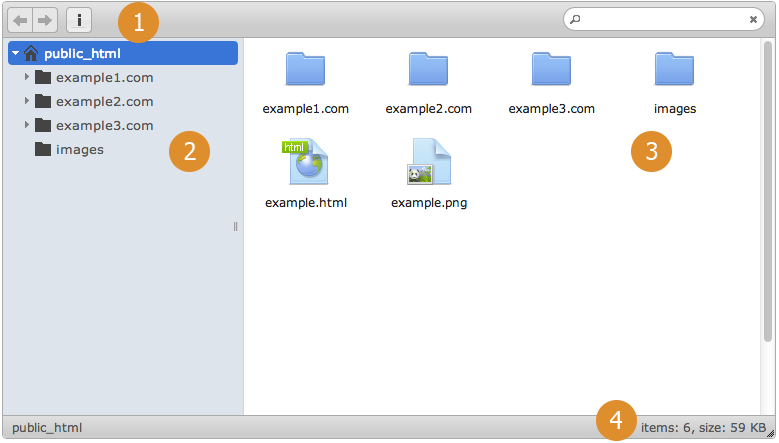
The File Browser interface.
- Toolbar — A series of buttons that quickly execute specific file browser functions when clicked. Listed below are the buttons included in the toolbar and their functions.
 — Move up or down levels of folders.
 — Get more information for the selected file.
- Folders pane — Organizes the folder hierarchy for easy navigation. Use the arrows to expand and collapse the different hierarchical levels.
- Files pane — Lists the files available in the selected folder.
- Status bar — The section at the bottom of the interface that displays information about the selected file, the total number of files in the folder, etc.
Get info window
The Get info window lists the selected file’s size, path, link, etc. The window will appear when you select a folder and click .
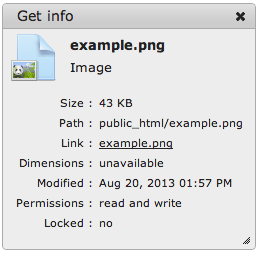
The Get info interface.
Was this answer helpful?
Also Read
File Manager allows cPanel users to manage and edit their files. The File Manager Directory...
The Backups area provides a basic interface for downloading and storing all or some of the...
The Backup Wizard is a user-friendly interface you can use to create a backup of the entire site,...
You can exclude files and directories from your backups by creating an exclude file in your home...
The Web Disk application allows you to manage and manipulate files on your server in multiple...